Wednesday, July 28, 2010

Love4Nails Inspired Waves


These nails are sooooo pretty! And not that hard, just took me forever because there are so many layers. I stole this design from Love4Nails on YouTube. She's got great tutorial videos so check her out if you haven't already. I started out with a regular French tip of Wet N Wild "French White Creme" then coated that with Sally Hansen "Diamonds" a white glitter. Then started on the stripes. I painted a coat of "Rain Check" Wet N Wild, it's like a very light purple-silver. Then made my stripes of blue with Sally Hansen "Blue Calypso" and then striped another coat on top of them with the blue glitter L.A. Colors "Blue Glitter", and silver glitter Sally Hansens "Strobe light. This took forever to dry, with so many coats on and then felt really 3-D so I covered it THREE TIMES with Sally Hansen No Chip Acrylic Top Coat, a REALLY thick top coat, and then my nails felt super smooth, not like sandpaper where the glitter polishes were.

Can You See Me?


Inspired by my boyfriend's Call of Duty game, he asked me to make some camo nails. I would have never thought about doing it, but I figured it out and they were super easy, especially for my left hand. Of coure, after I did this I covered it with glitter. The colors are Sally Hansen "Green with Envy", the purple is the green mixed with a drop of NYC "Plaza Plumberry" the beige is the green mixed with a drop of Milani "Awesome Orange" and the black is just whatever black, lol.

Kirsty's Flower Power Hippie Nails


Butterflies for Harmony


Sunday, July 25, 2010

DIY: Custom Striping Brush

If you don't want to drop $8 on a tiny tube of nail art polish, here's a super cheap (free) and easy way to make striping brushes out of your old nail polish.

You will need:
A bottle of old nail polish (that you do not use anymore)
Nail polish remover
Paper towels
Scissors

Step #1:
Take a bottle of nail polish that you no longer use. (I am using this bottle of white nail polish that is too thick and chunky to use anymore.) Take the cap/brush off and wipe the excess nail polish off with a paper towel. Before it starts to dry, clean the bristles carefully with nail polish remover. I like to fill the cap of the NPR with it and soak the brush for a few seconds, swirl it around until the color comes out.
Wipe the brush clean with a paper towel or cotton ball to dry. Note: all nail polish brushes are different! If you clean the brush off too roughly, you could easily pull the bristles out! So be careful if this is your first time; the brushes are sometimes very fragile.

Step #2:
Using your fingers, carefully split the bristles into two sections: a section that you want to keep, and a section that you are going to remove. I have split off roughly 15-20 bristles here that I want to keep. The less bristles you have, the thinner the stripes will be.
Step #3:
Use scissors to carefully cut off the sectioned you have decided to remove. Cut as close to the base of the brush as possible. If you are afraid to cut off too much, I would say just cut off half the bristles; you can always remove more later.


Step #4:
Test out your new custom made striping brush!! I drop a few dots of nail polish on a piece of paper and dip my brush in it to apply.

This is a really great way to make use of your retired nail polish, especially if you (like myself) have a problem throwing things away. Also, you can make them as thick or as thin as you want so you have just the right striping brush for you. You don't have to be a slave to the nail art polishes anymore. Hope this helps, and thanks for following!

Saturday, July 24, 2010

Pretty Pretty Flower Nails


This "Blue Calypso" base color by Sally Hansen has a coat of Sally Hansen HD "Blu" on top and I am IN LOVE with it! I painted on these really cute flowers on a few of my nails and a few simple stripes on the rest. I will do a tutorial on how to do these flowers ON REQUEST... they are really easy, they just take a little patience. So if anyone needs to knw how to do the flowers, just comment below and I'll post a tutorial. I'm so bad, I get a few people asking me HOW to do my designs, but I promise I will start posting tutorials, but only if people ask nicely. :) Anyways, I just did an asymetrical blue tip, and these pretty flowers! It's too bad I did 2 girls right after I did my nails and they were ruined by the end of the night. I would have kept them on longer, but good thing I snapped a photo!

Crazy Ass Nails OMG


I just got a little carried away with my nails and I'm not even going to explain how I did these. My nails apparently DID NOT enjoy this design; THREE of my acrylic nails broke or fell off RIGHT AFTER I did this. Do not attempt this design: very bad luck!

ADORABLE Rainbow Polkadotted Tips :)


Rainbows are not usually my kind of thing, but surprisingly I kept this set on longer than 1 day! I had it on for a full 2 days, and that's something. They are just SO cute! I painted on pink, orange, yellow, green, and blue French tips, and used my dotting tool to carefully make large white dots on top (and of course a good think layer of my go-to glitter top coat.) The following colors were used in this design:
NYC "Pink Promenade Creme"
MilaniNEON "Awesome Orange"
Sally Hansen Instant Dry "Lightening"
Wet N Wild "Green with Envy"
Sally Hansen Complete Manicure "Blue Calypso"
This is a simple, but very cute design that really doesn't require much talent, just a steady hand.

Wednesday, July 21, 2010

South park! <3


South Park kids! This took forevs to do, and when I was done, it looked to weird I just had to take a picture and then take them off! Enjoi anyways! ;)

Got grapes?


I had to take one of these pictures with a flash because you couldnt really see the design but I sorta warped the colors... This was just a fast asymetrical tip design I did when I was to lazy and lacking creativity. I don't even like the color purple anyways; it's a good thing I did this particular design because my roomate caught a glimpse of these and had me do an almost identical version on her. The lighter of the purple is Nicole by OPI's "Virtuous Violet" and the darker is "Purple Pizzazz" by Sally Hansen Hard as Nails. I used my dotting tool to line the seam between the two purps. Got graaapes?

New green tips!


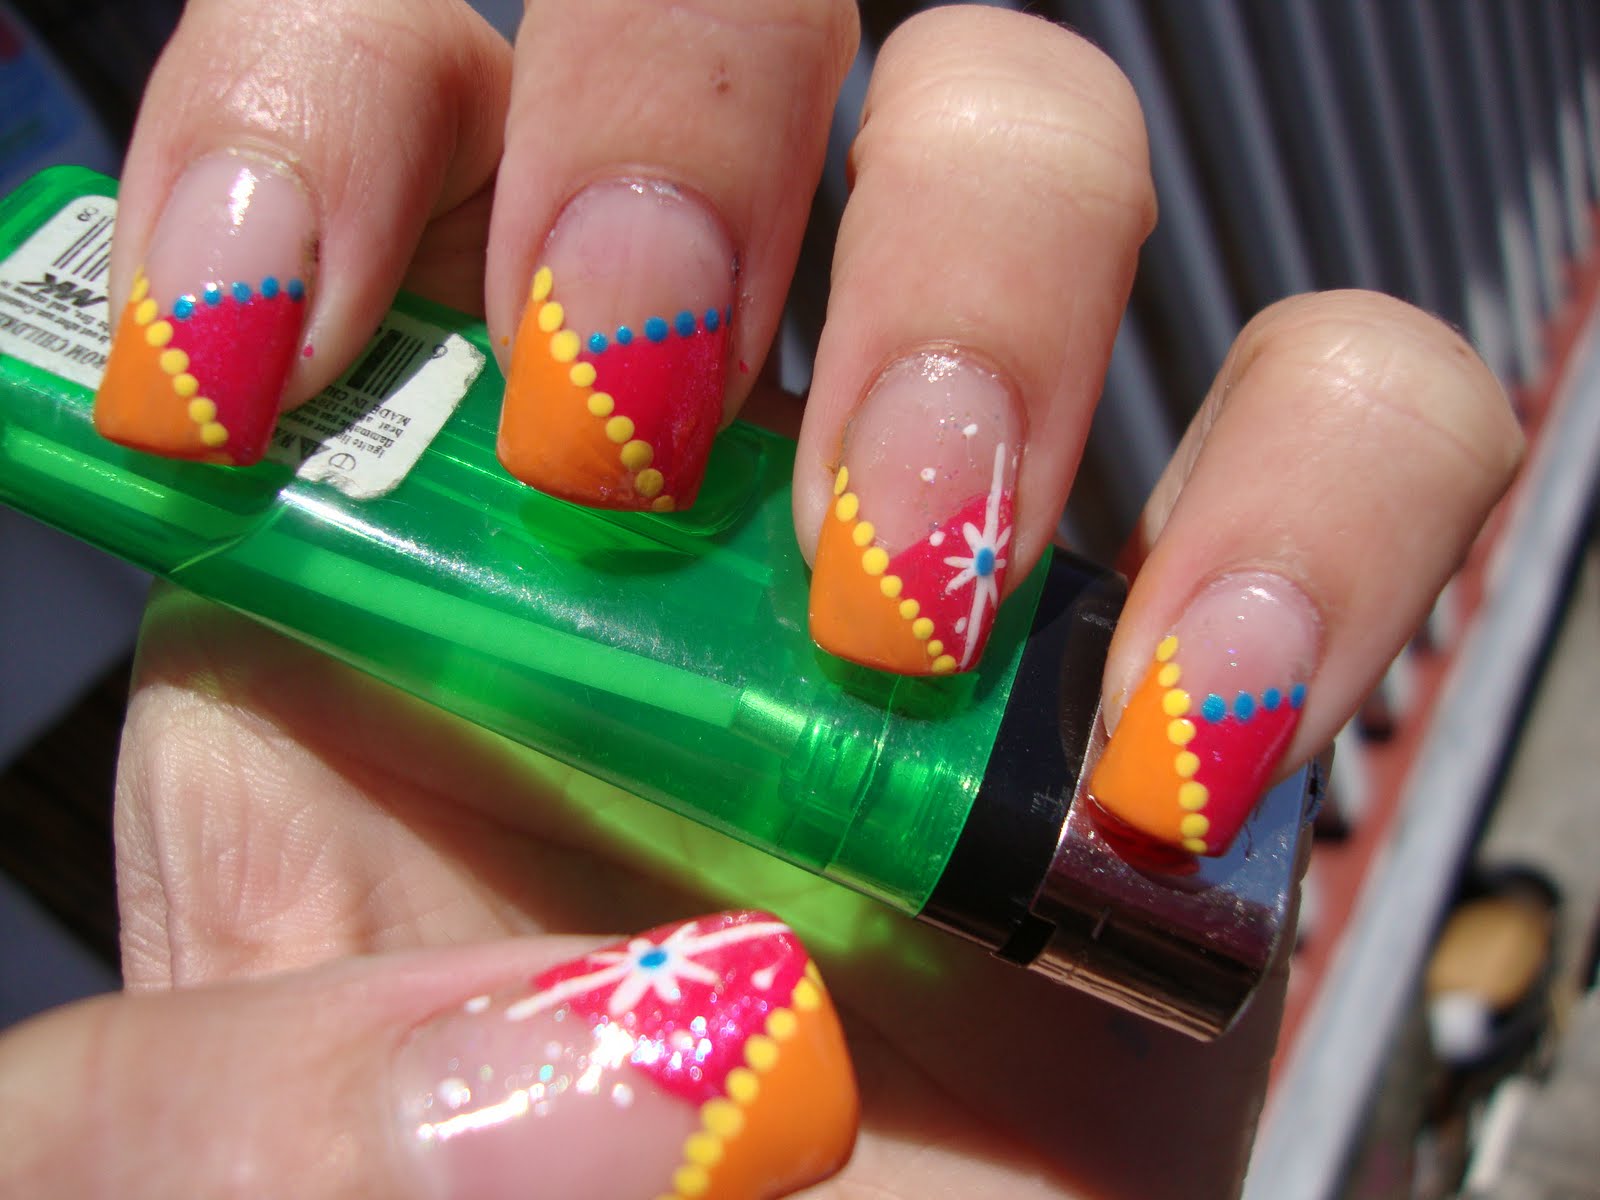
The lighter green on the tips is from my new stash, its "Big Money Frost" by NYC, underneath it is "Carribean Frost" by Wet N Wild. I did a layered asymetrical tip with black stripes coming from one corner. I'm going to call that kind of a design a "burst" until I can figure out another word that describes it. Anyways, I made the bursts black with my striping brush and on a few of them I painted a light coat of glitter just on top of the burst and coming out on to the ends of the stripes. It looked really cool in the sunlight, but not sure if you can see it in the pictures.

So behind... nails from last week!


This picture with my hand on rocks is actually my hand in a creek that was near when my boyfriend, my mom and I went on a hike in Truckee last Wednesday. Just thought it was a cool shot.
The white french tips are actually the first time I'd painted my nails white since I started doing my acrylics. I wanted to do them white because my whites are all getting too thick, so before they died I gave them one last hoorah as a base color before they retired to use only in designs. I used my dotting tool to make pink flowers and leaves, and actually at this time last week, I didn't have an opaque green, so I had to make this green out of a yellow and a bue to make the leaves around the flowers.

Monday, July 12, 2010

Enjoying my new color stash- new design!

More of my new color stash plus a sweet new design. The yellow and orange is "lightening" by Sally Hansen and "Awesome Orange" by Milani Neon. I did a sort of pound sign designs using my striping brush in orange on top of the yellow ring finger. Just to pull it together.


This design was friggen tedious; black and white stripes meeting in the middle on top of my new favorite,"Calypso Blue" Sally Hansen Complete Manicure. These new Sally Hansen brushes are awful. I'll try to post a picture soon of the brush, but to make a French manicure I had to use a brush from an OPI polish! Horrible. The instant dry polish by Sally Hansen also have the same brushes. Anyways, enjoy this design- I couldn't because I smudged almost every finger after taking the pictures!

Friday, July 9, 2010

New colors

My roomate brought home a ton of new nail polishes this afternoon including the new Sally Hansen HD polish. We got "Blu", a see-through sparkly medium blue, and "LCD", a see-though bright pink with tiny tiny blue sparkles in it. I used NYC "Pink Promenade Creme" as a base for my french tips and then topped them off with the "LCD". Then I added some twinkle designs with my striping brush in Sally Hansen Complete Salon Manicure "Calypso Blue" to bring out the blue sparkles in the pink, but I'm not sure if you can really see it in the pictures. Then I stuck some rhinestones on there and topped everything off with some top coat.
I was playing around before I did all my nails and painted this really cute skull, which I later redid on my roomate when I painted her nails. Enjoi.

Ode to Valencia's Shoes


Experimenting with my NEW really thin striping brush to make these white cross patterns. I painted my tips with Wet N Wild "Red Red" inspired by my friend's signature red heels. Nice.

Thursday, July 8, 2010

While watching the news...

While watching for potential riots on the news today in downtown Oakland, I was experimenting with some more designs. The first is boring; I used patches of white "French White Creme" by Wet N Wild, maroon "Burgundy Frost" by Wet N Wild, and a metallic light blue/purple "Rain Check" also by Wet N Wild. I just outlined it with some "Black Lace Creme" by NYC and there's some dots on there too because I'm so into dots since I found my new dotting tool. The second is an idea I got from Love4Nails on YouTube. She's amazing; she does lots of nail tutorials on YouTube and is really talented and the way she talks is just strangely relaxing! So for those who haven't seen her YouTube videos, definitely check her out! I made four checkered patches and outlined them with white dots. I used Nicole's "Respect the World" as the blue, Nicole's "Virtuous Violet" for purple, "Caribbean Frost" by Wet N Wild as the greenish blue, and "Burgundy Frost" by Wet N Wild as the maroon. Then of course, as I do with most every design, covered it in glitter BEFORE dotting on the white outlines.

Wednesday, July 7, 2010

Orange and pink zeebz ;)


I finally decided to take some pictures with my camera; they are WAY clearer and you can really see the details. I will try to make a habit of using my camera instead of my iPhone. I used Wet N Wild "Sunny Side Up" for the orange, and Wet N Wild "Blazed" as the salmon/coral color.

Experimentation Time

Im experimenting with designs right now while my boyfriend plays video games. This is just an asymetrical tip design with layers of blue and purple, and of course, glitter. The lightest blue that I used is Nicole's "Respect the World", in the middle is one coat of Sally Hansen Hard as Nails "Purple Pizzazz" and then a second coat to make the third stripe. I did add three hot purple dots to the left side (one for each different color of stripes) but you can barely see it in the picture I took with my iPhone. I've been so lazy taking the pictures because its so much faster to upload with my iPhone than it is to upload the pictures from my camera to the computer. I'll do that someday when I'm not so lazy.